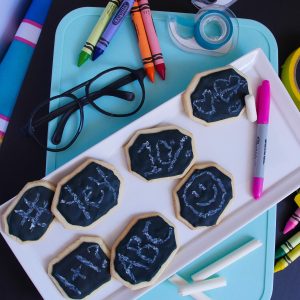
Edible chalkboard cookies
School is in full force now and you’re probably already used to the routine, so how about these nice edible chalkboard cookies to add some fun to the lunchbox?
Equipment
- Wide straws
- Ruler
Ingredients
Edible chalkboard
- 1 stick of unsalted butter, at room temperature
- ½ cup of white sugar
- 1 egg, at room temperature
- 1 tsp of vanilla extract
- 1 ½ cups of all-purpose flour
- ½ tsp of baking powder
- ½ tsp of salt
- 1 tsp of cinnamon
- 1 cup of bright white candy melts or white chocolate chips (for edible chalk)
Royal icing
- ¾ tbsp of meringue powder
- 2 cups of powdered sugar
- 1½ tsp of cocoa powder
- 3 tbsp of warm water + more later to achieve color flow icing
- Black gel food coloring (or powdered)
Instructions
- Let's begin with the sugar cookies beating white sugar and butter together. Mix well, and then add an egg and a bit of vanilla.
- In a separate bowl, add flour, baking powder, salt, and cinnamon.
- Gradually beat in the dry ingredients with the wet ingredients. You'll end up with a yummy smelling dough.
- Transfer the cookie dough to plastic wrap and seal it well. Then, stick it in the fridge for 30 minutes.
- Before taking the dough out of the fridge, preheat the oven to 375 °F.
- Extend the dough with a rolling pin. Remember to flour the surface and your rolling pin thoroughly first.
- Your dough thickness has to be about 1/8 of an inch. To cut the cookies, use a ruler so that you can create some good-looking rectangles.
- Transfer the dough rectangles to a baking sheet lined with parchment paper. Cut the cookies' corners with a knife at a 45° angle. Then, bake your cookies for 10 to 14 minutes. Once they're ready, take them out of the oven and let them cool before decorating them.
- While the cookies cool, make your royal icing. It'll be the perfect surface to write on top of your chalkboard. Mix the meringue powder, powdered sugar, cocoa powder, and warm water in a glass or metal bowl. Beat the mix thoroughly, and once it's halfway incorporated, add the gel food coloring.
- Don't worry if it looks messy in the beginning. It will develop and turn darker as you beat the mix. Use high speed for seven to ten minutes until you get a black and shiny mix.
- Before applying the icing, we need to use the color flow icing technique. Add water to the mix little by little. We want to get it runny enough to be smooth but not too runny to fall off the cookie.
- You'll know that you're icing is perfect when it incorporates and smooths out in a few seconds.
- Transfer the icing to a pastry bag with a small tip and decorate the cookies. Cover the top carefully using the pastry bag, and then extend the icing with a toothpick or an appropriate tool.
- Let the royal icing dry overnight so that you can write on it. To make your chalk, melt white chocolate in the microwave.
- Transfer the melted chocolate to a resealable bag and cut a corner so that you can use it like a pastry bag.
- Squeeze the melted chocolate into three wide straws until you fill 3/4 of each one. Place the wide straws on a small bowl with sugar so that the chocolate doesn't drip out of them. Then, stick them in the freezer for 10 minutes.
- Once the chocolate is hard, take it out of the fridge. You'll get your chalk by pushing from the empty parts of the straws. Then, you can write with your chocolate chalk on your cookies.
- And it's done!
Video
Notes
